Transforming Memories: My Journey from Slides to Stunning Digital Pictures
As I rummaged through a dusty box in my attic, a wave of nostalgia washed over me. Buried beneath a tangle of old toys and forgotten keepsakes, I stumbled upon a collection of slides—vivid snapshots of moments from a bygone era, captured in a way that felt both intimate and timeless. It struck me how these fragile pieces of film held stories waiting to be re-told, yet they remained trapped in a format that few could appreciate. This encounter sparked my curiosity about the journey of transforming these slides into digital pictures, a process that not only revives precious memories but also bridges the gap between generations. In a world where digital imagery reigns supreme, the art of converting slides into a modern format is not just about preservation; it’s about celebrating our shared histories and ensuring that the moments that shaped us don’t fade away into obscurity. Join me as I explore the fascinating intersection of nostalgia and technology, and discover how we can bring the past into the digital age.
I Personally Explored the Best Hiking Trails and Shared My Insights Below

Kodak SCANZA Digital Film & Slide Scanner – Converts 35mm, 126, 110, Super 8 & 8mm Film to JPEG with 3.5″ LCD, Easy-Load Inserts & Adapters
ClearClick QuickConvert 2.0 Photo, Slide, and Negative Scanner – Scan 4×6 Photos & 35mm, 110, 126 Film – No Computer Required – 22 MegaPixels

Magnasonic All-in-One 25MP Film Scanner with Large 5″ Display & HDMI, Converts 35mm/126/110/Super 8 Film & 135/126/110 Slides into Digital Photos, Built-in Memory

22 MP Film & Slide Scanner with Large 5 Inch LCD Screen, Digital Film Scanner Built-in 16GB Memory Converts B&W/135/110/126 KPK Negative and Super 8/Monochrome Slides into JPEG Photos
1. Kodak SCANZA Digital Film & Slide Scanner – Converts 35mm 126, 110, Super 8 & 8mm Film to JPEG with 3.5 LCD, Easy-Load Inserts & Adapters
As I delve into the features of the Kodak SCANZA Digital Film & Slide Scanner, I can’t help but feel a wave of nostalgia wash over me. This remarkable device is not just a scanner; it’s a time machine that allows me to revive cherished memories that may have faded over the years. It’s designed to convert old 35mm, 126, 110, Super 8, and 8mm negatives and slides into high-quality JPEG digital files in mere seconds. That’s right – in seconds! With a powerful 14/22MP resolution, the SCANZA ensures that the rich colors and details of my precious films are preserved in stunning clarity.
The large, bright 3.5” TFT LCD display is a standout feature that I truly appreciate. It offers high definition and allows for adjustable brightness, which means I can easily view my scans in any lighting condition. The tilt feature is incredibly convenient, enabling me to position the screen at the perfect angle for comfortable viewing. This thoughtful design makes the scanning process not just efficient but also enjoyable, turning what could be a tedious task into a delightful experience.
One of the most impressive aspects of the Kodak SCANZA is the variety of adapters and film inserts that come with the unit. This means I don’t have to worry about compatibility issues; everything I need is right there in the box. The big one-touch buttons simplify the operation, allowing me to scan and save images with a single press. This user-friendly approach is perfect for anyone, regardless of their technical prowess. Whether I’m a seasoned tech enthusiast or a novice looking to digitize family memories, the intuitive user interface makes it accessible for all.
Moreover, the SCANZA includes helpful features that enhance the overall experience. The tray and insert directory guide me through the process, and I can easily edit image RGB and resolution to achieve the desired look for my photos. While it’s important to note that the SD card is not included, the scanner supports cards up to 128GB, which provides ample space for my digitized collection. This flexibility is a huge plus, allowing me to store countless memories without worry.
Another advantage is the inclusion of various cables and extras, making the Kodak SCANZA compatible with both Mac and PC. The USB power cable, HDMI cable, AC adapter, and video cable mean I can easily connect the scanner to my devices and enjoy the results on a larger screen if I choose. Additionally, the free film cleaning brush is a thoughtful addition that helps ensure my scanned images are free of dust and speckles, further enhancing their quality.
Ultimately, I believe the Kodak SCANZA Digital Film & Slide Scanner is an invaluable tool for anyone looking to preserve their film memories in a modern format. With its ease of use, impressive features, and high-quality output, it’s an investment that will pay off in countless ways. If you’re like me and cherish the moments captured on film, I highly recommend considering the SCANZA for your digitization needs. It’s not just a purchase; it’s a way to keep the past alive.
Feature Description Film to JPEG Conversion Converts 35mm, 126, 110, Super 8 & 8mm negatives & slides to JPEG in seconds with 14/22MP resolution. 3.5” TFT LCD Display High definition display with adjustable brightness and tilt for easy operation and viewing. Multiple Adapters Includes various film inserts and adapters for fast and flexible operation. User-Friendly Interface Features an intuitive interface with helpful trays and directories for easy navigation. Cables & Extras Comes with USB power cable, HDMI cable, AC adapter, video cable, and a free film cleaning brush. SD Card Support Supports SD cards up to 128GB for ample storage of digitized images.
Get It From Amazon Now: Check Price on Amazon & FREE Returns
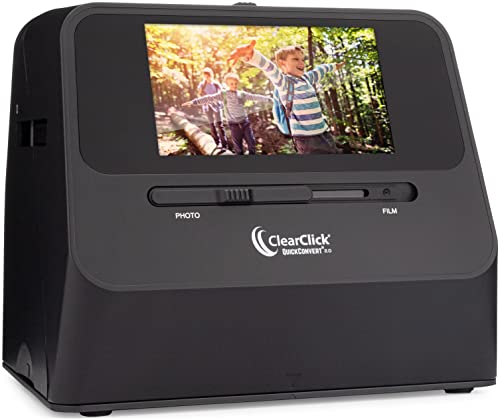
2. ClearClick QuickConvert 2.0 Photo Slide, and Negative Scanner – Scan 4×6 Photos & 35mm, 110, 126 Film – No Computer Required – 22 MegaPixels
As someone who values preserving memories, I am genuinely excited to share my thoughts on the ClearClick QuickConvert 2.0 Photo, Slide, and Negative Scanner. In today’s digital age, keeping our cherished moments alive in a format that we can easily access and share is essential. This scanner provides an effortless way to convert old photos, slides, and negatives into digital formats. It’s designed for users like me who may not be tech-savvy or don’t want to deal with complicated setups involving computers or software installations.
One of the standout features of the ClearClick QuickConvert 2.0 is its ability to scan photographs, slides, and negatives one at a time. While it lacks an autofeeder, this might actually be a benefit, as it allows for careful handling of each piece, ensuring that every scan is done with attention to detail. The super quick conversion time of just 2-3 seconds per scan is impressive; it means that I can easily process a significant number of photos in a short period. This efficiency is especially beneficial if I’m looking to digitize a large collection of family memories or historical pictures.
The scanning quality is another reason I believe this product stands out. With a scanning resolution of 14 MegaPixels (and 22 MegaPixels interpolated), my photos will be captured with clarity and detail, preserving colors and textures beautifully. The fact that these scans are saved as JPEG files on an SD memory card means I can easily transfer them to my computer or cloud storage, making sharing with friends and family a breeze.
One of the features I appreciate is the built-in rechargeable battery. This means I can scan photos cord-free, offering flexibility and convenience. It’s perfect for those days when I want to sit on the couch and go through old family albums without being tethered to a power outlet. The 5” instant preview LCD screen is also a fantastic addition, allowing me to see my scans right away, ensuring that I am satisfied with each one before moving on.
Another great aspect of the ClearClick QuickConvert 2.0 is its ability to scan photos without requiring me to remove them from albums or mounts. This feature is a huge time-saver and reduces the risk of damaging any photos that are fragile or old. However, it’s important to note that this scanner does not support 5×7 photos, which is something I need to keep in mind when planning my digitization project.
Lastly, I appreciate the two-year warranty and tech support provided by ClearClick, a small business in the USA. This level of support offers peace of mind, especially for someone like me who might have questions or need assistance along the way. It’s always reassuring to know that I have access to help if I need it.
In summary, the ClearClick QuickConvert 2.0 Photo, Slide, and Negative Scanner is an excellent investment for anyone looking to preserve their memories in a digital format. With its quick scanning capabilities, high-quality results, and user-friendly design, it’s perfect for both beginners and those who are more experienced with technology. I feel confident recommending this product to anyone interested in safeguarding their precious moments. If you’re ready to bring your old photos back to life, I encourage you to consider the ClearClick QuickConvert 2.0 – it truly is a worthwhile addition to your home.
Feature Description Scanning Speed 2-3 seconds per scan Scanning Quality 14 MegaPixels (22 MegaPixels interpolated) Format Saves as digital JPEG files on SD memory card Power Source Built-in rechargeable battery for cord-free scanning Display 5” instant preview LCD screen Photo Handling Scans without removing from albums or mounts (5×7 not supported) Warranty 2-year warranty & tech support
Get It From Amazon Now: Check Price on Amazon & FREE Returns
3. Magnasonic All-in-One 25MP Film Scanner with Large 5 Display & HDMI Converts 35mm-126-110-Super 8 Film & 135-126-110 Slides into Digital Photos, Built-in Memory
As I delve into the realm of film scanning, I can’t help but feel excited about the Magnasonic All-in-One 25MP Film Scanner. This innovative product is not just a scanner; it’s a time machine that transports my cherished memories from the past into the digital age. With the ability to convert various film formats—35mm, 126, 110, Super 8, and even 8mm film—this device is a comprehensive solution for anyone looking to preserve their photographic history. I find the prospect of transforming my old film and slides into high-quality JPEG digital files incredibly appealing, especially considering the emotional value attached to those images.
One of the standout features of the Magnasonic scanner is its large, bright 5″ TFT LCD display. This screen allows me to view my films, slides, and scanned images directly on the scanner, making the entire process intuitive and engaging. I can even connect the device to my TV or monitor via HDMI, which enhances my viewing experience further. Imagine gathering friends or family around to relive those precious moments displayed on a large screen—what a wonderful way to share memories!
Another aspect that I appreciate is the adapter system that comes with the scanner. It’s designed to handle multiple film formats with ease, allowing me to fast-load various inserts and scan photos in less than five seconds. This efficiency means I can digitize my entire collection without spending hours hunched over a scanner. The fast-loading trays are compatible with all film formats, including 35mm negatives, making this a truly versatile device.
Storage is always a concern when it comes to digital files, but the Magnasonic scanner has addressed that with its built-in memory and SD card slot. With 64MB of internal memory and the capability to expand up to 128GB using an SD card (not included), I can rest assured that I have enough space to scan and save a lifetime of photos. This feature is particularly helpful for someone like me who loves to document every moment, whether it’s a family gathering or a solo adventure.
The intuitive user interface is another reason why I feel drawn to this product. The quick and easy setup allows me to start scanning without the hassle of software or driver installations. I can adjust brightness, perform RGB color correction, and flip or mirror images directly on the scanner. This level of control empowers me to ensure that my digital reproductions are as true to life as possible, enhancing the quality of my treasured memories.
In conclusion, the Magnasonic All-in-One 25MP Film Scanner has everything I could possibly need to preserve my film and slides in a digital format. The combination of a powerful scanner, user-friendly design, and ample storage options makes it an ideal choice for anyone looking to cherish their memories. If you’re like me and want to ensure that your photographs are preserved for future generations, I strongly encourage you to consider this product. Don’t let your memories fade away—take the plunge and invest in the Magnasonic scanner today!
Feature Description 25MP Film Scanner Converts various film formats into JPEG digital files. 5″ TFT LCD Display View films, slides, and scanned images directly on the scanner. Fast-Loading Adapters Compatible with multiple film formats, scans in less than 5 seconds. Built-in Memory 64MB internal memory with expandable SD card slot (up to 128GB). User-Friendly Interface No software installation required; adjust settings directly on the scanner.
Get It From Amazon Now: Check Price on Amazon & FREE Returns
4. 22 MP Film & Slide Scanner with Large 5 Inch LCD Screen Digital Film Scanner Built-in 16GB Memory Converts B&W-135-110-126 KPK Negative and Super 8-Monochrome Slides into JPEG Photos
I recently came across the 22 MP Film & Slide Scanner with Large 5 Inch LCD Screen, and I can’t help but feel excited about its potential to transform how I preserve and share my cherished memories. In an age where digitalization is key, this product promises to breathe new life into my old film and slides, making it easier than ever to convert them into digital JPEG photos. It’s not just about scanning; it’s about revitalizing memories that could otherwise fade away. The ability to quickly convert color and black-and-white negatives into digital format with just one press is incredibly appealing, especially for someone like me who values nostalgia and the stories that come with those images.
The large 5-inch LCD display caught my attention immediately. The high-definition color screen provides a superb viewing angle of up to 178°, which makes it perfect for previewing and editing photos in real time. I can already envision using this feature to relive my favorite moments, showing them off to family and friends, and even using it as a digital photo frame to display the images around my home. The playback function is a bonus that adds a layer of versatility, allowing me to not only scan but also showcase my old photos with pride.
One of the standout features of this scanner is its multiple adapters for fast scanning. The all-in-one design allows me to convert various types of negatives and slides, such as 35mm, 126KPK, and Super 8, into sharp JPEG images. The specially designed adapters promote continuous loading, which means I can quickly process multiple films without hassle. This efficiency is essential for anyone who has a collection of old slides or negatives waiting to be digitized. The swift scanning process not only saves time but also makes the entire experience enjoyable, rather than a tedious chore.
What truly impresses me is the instant editing capabilities. Gone are the days of needing complicated software to enhance my photos. With this scanner, I can mirror, flip, and adjust exposure and color settings during the scanning process. All it takes is selecting the correct film type and setting the resolution, either 14.0 or 22.0 megapixels. This user-friendly approach is perfect for someone like me who appreciates simplicity while still wanting to achieve high-quality results. It gives me control over how my memories are preserved and shared.
Moreover, the built-in 16GB memory is a thoughtful addition. I won’t need to worry about carrying extra SD cards or finding additional storage solutions. This makes it incredibly convenient to start scanning right away. The included Type-C to USB data cable allows me to easily transfer and back up my scanned photos to my computer, ensuring that my memories are securely stored. It’s also reassuring to know that I can connect the scanner to various computer systems without any hassle.
In conclusion, the 22 MP Film & Slide Scanner seems like a game-changer for anyone looking to digitize their precious memories. It’s user-friendly, efficient, and packed with features that cater to both novice users and those who appreciate more advanced functionalities. I can genuinely see how this product can enhance my life by helping me preserve the past while making it accessible and shareable in the present. If you’re someone who values memories and wants to keep them alive in a modern format, I strongly encourage you to consider adding this scanner to your collection. You won’t regret bringing your memories back to life!
Feature Description Memory Format Converts color & B&W negatives/slides into JPEG photos Display 5 inch LCD HD display with 178° viewing angle Adapters Multiple adapters for 35mm/126KPK/110 color & B&W negatives/slides Editing Instant editing options during scanning process Memory Capacity Built-in 16GB memory for direct storage
Get It From Amazon Now: Check Price on Amazon & FREE Returns
Why Slides Into Digital Pictures Helped Me Preserve My Memories
As someone who has always cherished my memories, transitioning my old slides into digital pictures was a game changer for me. I found that digitizing my slides not only helped me preserve precious moments from the past, but it also made it easier to share these memories with friends and family. Instead of rummaging through boxes in my attic, I can now access my favorite photos with just a few clicks, making them much more accessible and enjoyable.
Moreover, I noticed that converting slides to digital format allowed me to enhance and restore some of my favorite images. Many of my old slides had faded colors or imperfections that I thought were permanent. However, with digital tools, I was able to restore those images, bringing them back to life in a way I never thought possible. This process not only rekindled memories but also gave me a sense of accomplishment and creativity as I experimented with photo editing.
Finally, I found immense joy in the ability to create digital albums and slideshows. This allowed me to organize my memories chronologically or thematically, making it easier to relive special moments. Sharing these digital albums with loved ones has sparked conversations and reminiscing, deepening my connections with them.
Buying Guide: Slides Into Digital Pictures
Understanding My Needs
When I first decided to digitize my slides, I realized I needed a clear understanding of my requirements. I wanted to preserve memories while ensuring the quality of the digital images matched the originals. Reflecting on my collection, I considered the number of slides I had and the condition they were in. This helped me determine how much time and effort I was willing to invest.
Researching Available Options
I began my journey by exploring different methods for converting slides into digital formats. I found options ranging from professional services to home-based scanners. Each method had its pros and cons. I took note of factors like quality, cost, and convenience. This step was crucial as it helped me narrow down what would work best for me.
Quality of the Digital Output
One of my top priorities was the quality of the digital images. I learned that resolution plays a significant role in how well my slides would translate to digital form. I aimed for a scanner that offered high resolution to capture the fine details of my slides. Additionally, I considered the color accuracy and how well the device could handle older, faded slides.
Ease of Use
As I explored my options, I valued ease of use. I preferred a device that I could operate without extensive technical knowledge. I looked for features like user-friendly interfaces and straightforward instructions. This would save me time and frustration during the digitization process.
Speed of Conversion
I also weighed the speed of converting slides. I had a significant number of slides, and I wanted to avoid a lengthy process. I found that some devices offered quicker scanning times than others, which could make a substantial difference when I had a batch to work through.
Compatibility and Connectivity
Understanding the compatibility of the device with my existing technology was important. I wanted to ensure that the scanner could connect easily to my computer or other devices. Additionally, I considered the file formats it supported, as I wanted to have flexibility in how I stored and shared my digital images.
Price Considerations
Budgeting played a crucial role in my decision-making process. I set a range for what I was willing to spend on the equipment or service. I found that prices varied greatly, so I took the time to compare features against cost. This helped me identify the best value for my needs without overspending.
Reading Reviews and Recommendations
To make an informed choice, I turned to online reviews and user feedback. I appreciated hearing from others who had similar experiences. Their insights helped me understand the strengths and weaknesses of various options. I made a list of potential choices based on what I found.
Finalizing My Choice
After careful consideration, I compiled all the information I gathered to make my final decision. I evaluated how each option aligned with my needs and preferences. This thorough approach gave me confidence that I was making the right choice for digitizing my cherished slides.
Enjoying My Digitized Memories
Once I completed the process, I was thrilled to revisit my slides in digital format. Having the ability to share and preserve these memories in a modern way felt incredibly rewarding. I encourage anyone considering this journey to take the time to research and find the best fit for their own needs.
Author Profile
-
I am Victor Yefremov, co-founder of XpenseOne, and my passion lies in building solutions that make financial management effortless. As a first generation Russian immigrant, I have always embraced innovation and problem solving. And these principles have guided my career in fintech.
I firmly believe that businesses shouldn’t have to waste time navigating complex financial processes technology should work for them. At XpenseOne, we are committed to delivering smart. Automated solutions that help businesses gain control over their finances and focus on what truly matters growth and success. If you are looking for a better way to manage expenses, we are here to help. Let’s build the future of financial efficiency together.
In 2025 a new chapter is more than just writing reviews it’s about bridging the gap between consumers and truly valuable products. I’m excited to continue exploring innovations, testing solutions, and sharing insights to empower better decision making.
Latest entries
- February 24, 2025Personal RecommendationsWhy I Switched to the AOC 27 Inch Curved Gaming Monitor: An Expert’s First-Hand Experience
- February 24, 2025Personal RecommendationsWhy I Swear By Fly Socks for Horses: My Personal Experience and Expert Insights
- February 24, 2025Personal RecommendationsWhy I Switched to Navy Blue Low Heel Dress Shoes: My Expert Take on Comfort and Style
- February 24, 2025Personal RecommendationsTransforming My Driving Experience: How a Steering Wheel Table Tray Became My Ultimate Road Trip Companion